
HomePony Know HowRiding TipsFlatworkShape up your schooling

-
Pony Care Tips
Learn everything you need to know about caring for your fave pony. From feeding and grooming to mucking out – we have it all here!
-
Riding Tips
Improve your riding with our fab articles! Whether it's building your confidence, riding shapes, or jumping spreads that you need tips on, we have something for every rider.
Latest News
Shape up your schooling
Posted in Flatwork
Shapes spice up your schooling, plus you’ll find them in dressage tests, so get practising with our top tips
Riding shapes toolkit
- Get the correct bend for the direction you’re travelling in – essential!
- Look for your markers and prepare your lines and turns in advance. This will keep you focused and help your accuracy.
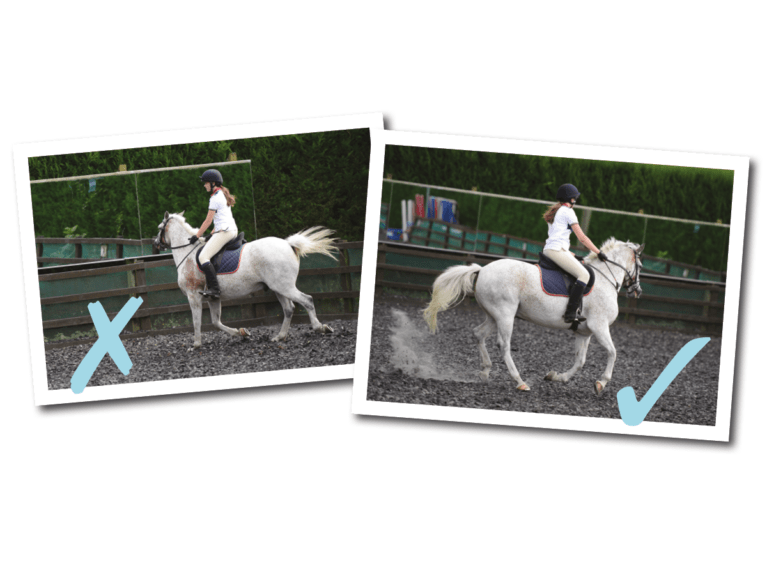
- Change your diagonal when riding a shape in trot that involves a change of rein.
- Be accurate! Make sure you’re strict about meeting markers when you need to or your shape won’t be correct.
- Keep a steady rhythm because it’ll be easier to control your pony.
Top tip! If you ride a shape that isn’t accurate, repeat it until it’s right. Don’t get into the habit of riding inaccurately!
Did you know? Riding shapes helps improve your accuracy, as well as your pony’s suppleness and responsiveness
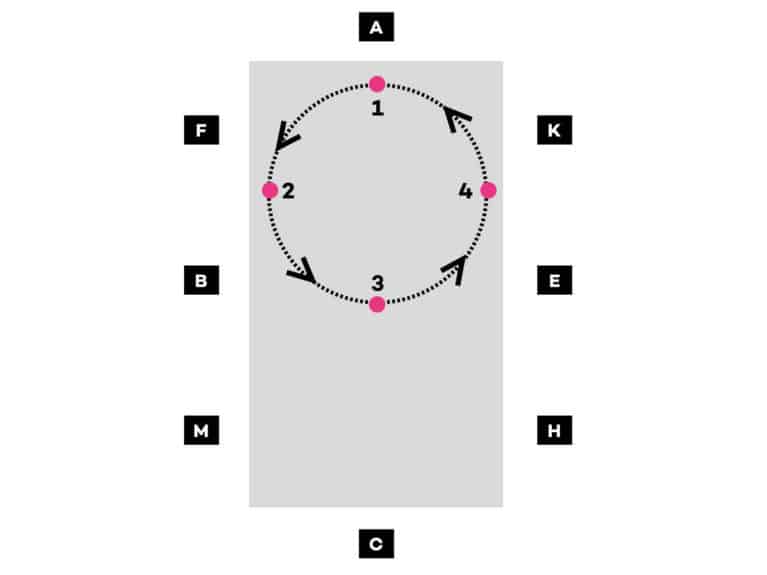
Start with circles
The most common shape to ride is a 20-metre circle, although they’re not as simple as you might think. A correct circle has four points. The points of a circle starting at A on the left rein are…
point 1: A
point 2: between F and B
point 3: X
point 4: between E and K
To ride it correctly, think of joining up the points using four smooth arcs. Perfect your 20-metre circles in walk first, as you’ll have more control and time, then build up to trot and canter.
Once you can ace these, try smaller 15- and 10-metre circles. These are great for improving your pony’s bend and suppleness.
Common problems
Falling in
Falling in is where your pony drifts to the inside, so your 20-metre circle might end up more like a wonky 15-metre circle! It happens when your pony isn’t bending correctly and loses balance or doesn’t have enough impulsion.
Falling out
This is where your pony drifts to the outside. It’s common with unbalanced or stiff ponies who find bending tricky. It’s more likely to happen on smaller circles and when riding circles in trot or canter.
Too square
Following the track to ride your circle means your turns will be sharper and create more of a square.
Loops
Loops are a great test of your accuracy and your pony’s suppleness. You can ride a 10-metre loop, where you’ll pass over X at the centre point, or a 5-metre loop where you meet the three-quarter line between X and E or B. To ride a 10-metre loop from F to M on the left rein, visualise the line you’ll take as you pass A and aim to leave the track just before your body reaches F. Ride a smooth curve to X, brushing the centre line for a couple of strides, then ride another curve from X back to M.
Top tip! Change your pony’s bend to ride your loop, then back again as you rejoin the track.

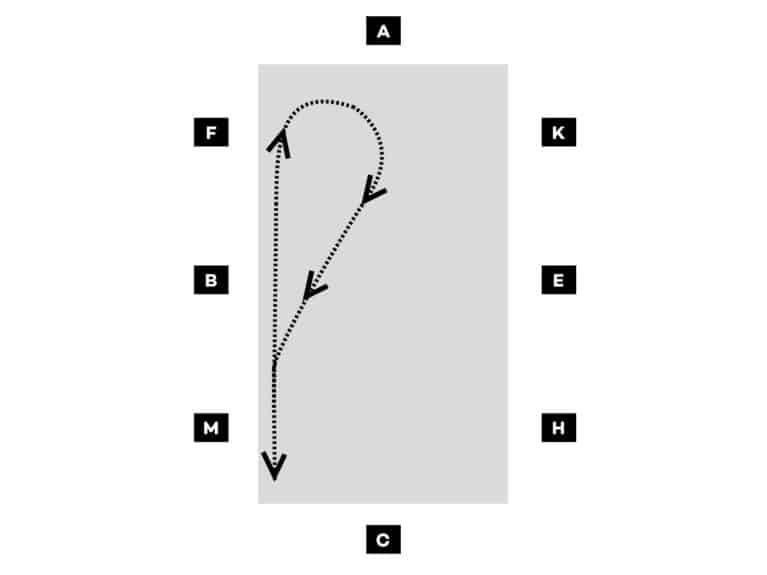
Teardrops
To ride a teardrop well, you need good control and your pony listening to you. On the right rein, pass C and ride up the long side, preparing to make a half 10-metre circle at F. As you ride the half circle, look back towards the track at the point you want to rejoin it (between B and M). This will help you ride a straight, accurate line. If you wait until you’ve completed your half circle to look back to the track you might misjudge your line, which will cause you to be wonky.
Riding teardrops in canter can be tricky, because it requires excellent balance and accuracy, so make sure you’re confident riding them in walk and trot first.
Top tip! Use teardrops in your schooling session as a different way to change the rein.
Did you know? When riding a teardrop in canter, remember to change your pony’s canter lead or come back to trot just before you reach the track, otherwise he’ll be on the incorrect lead. The fancy name for a teardrop is a demi-volte – that’s French!
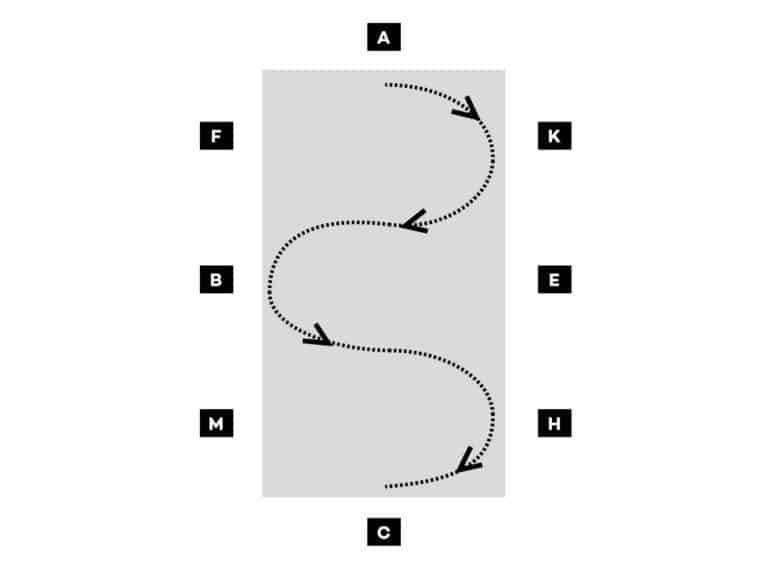
Serpentines
Serpentines can consist of three or four loops and are essentially a series of half circles joined together. It’s important to change your pony’s bend each time you ride over the centre line. Encourage him to do this by looking and gently turning your body in the direction you’re going, as well as slightly opening your inside rein.
Top tip! Keep each loop the same size. The more accurate you are to the markers, the easier this will be.
Your Comments
Related Articles


Leave a Reply
You must be logged in to post a comment.