
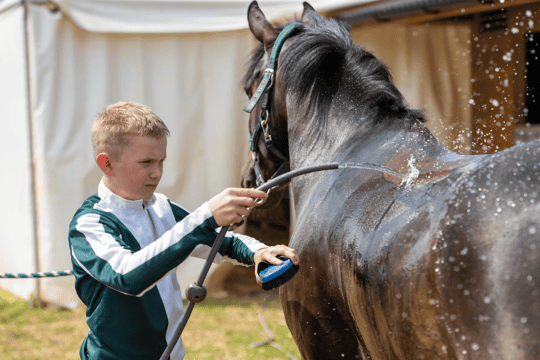
HomePony Know HowRiding TipsFlatwork4 polework exercises with Nina Gill

-
Pony Care Tips
Learn everything you need to know about caring for your fave pony. From feeding and grooming to mucking out – we have it all here!
-
Riding Tips
Improve your riding with our fab articles! Whether it's building your confidence, riding shapes, or jumping spreads that you need tips on, we have something for every rider.
Latest News
4 polework exercises with Nina Gill
Posted in Flatwork
Put all your riding skills to the test with one ace layout!
Check out this awesome layout to put you and your pony to the test. So, hop in the saddle and get ready to have some fun!
Setting up your poles
For this layout you’ll need 14 poles – ideally standard 3m ones. Start by making a square in the middle of the arena, then create two triangles on each corner at one end. Between the two triangles place a pair of parallel poles to form a channel into the square. Finally, place a pole on each spare corner of the square and roll it out so it’s 3m away from the point.
Remember!
Always ride through lines in walk first. It allows your pony to learn where you’re going and helps boost his muscle development, too!
Your warmup checklist
Throughout my series, I’ve highlighted the importance of your warm-up and what you need to do to get your pony in the zone for your polework session. As a reminder, here are some questions to ask yourself as you’re warming up…
- have I worked my pony evenly on both reins?
- does he respond to my leg aids?
- have I ridden lots of turns, circles and transitions?
- am I focused on the task ahead?
- is my pony working forwards, feeling tired or just being lazy?
Remember that it’s best to save your polework session for another day if your pony’s tired. You don’t want him tripping up and injuring himself. If he’s being lazy, have a go at more transitions to get him awake and responsive to you.
Start with a simple polework exercise
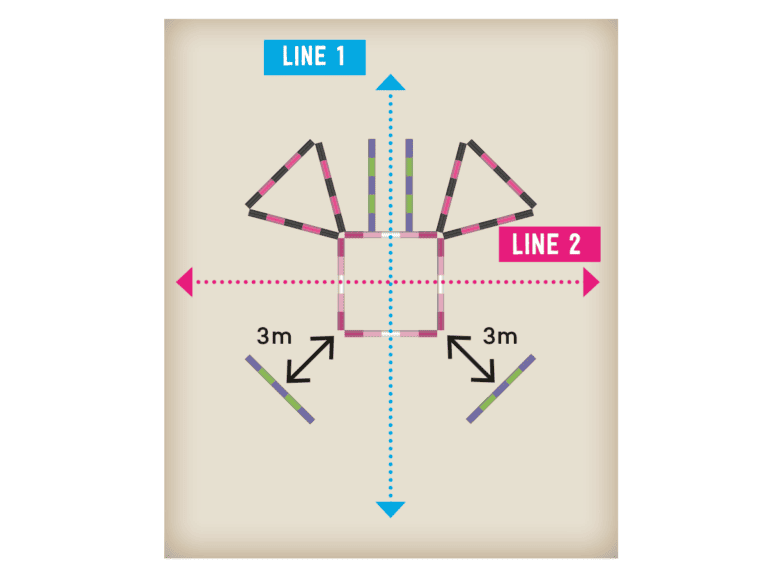
The first two lines will test your straightness. Line 1 lies along the centre line, and it’s best to start at the end with the two parallel poles as this will channel your pony into the layout and help set up a perfect approach. Line 2 is slightly trickier because you have no guide poles on your way in or out, but keep aiming for the middle strip of the pole and you’ll ace it. Don’t forget, you can ride through these lines in both directions.
Top tip
While you’re warming up, you want your pony to be working actively in trot and feel as if he’s ready to pop into canter at any moment when given the aid.
Think about…
- keeping your rein contact and leg pressure even
- looking up and straight ahead
Top tip
If you’re struggling to process a big polework layout or you’re worried your pony might find it hard, try to think about just keeping him straight and forward, then let him do the rest.
Focus on accuracy
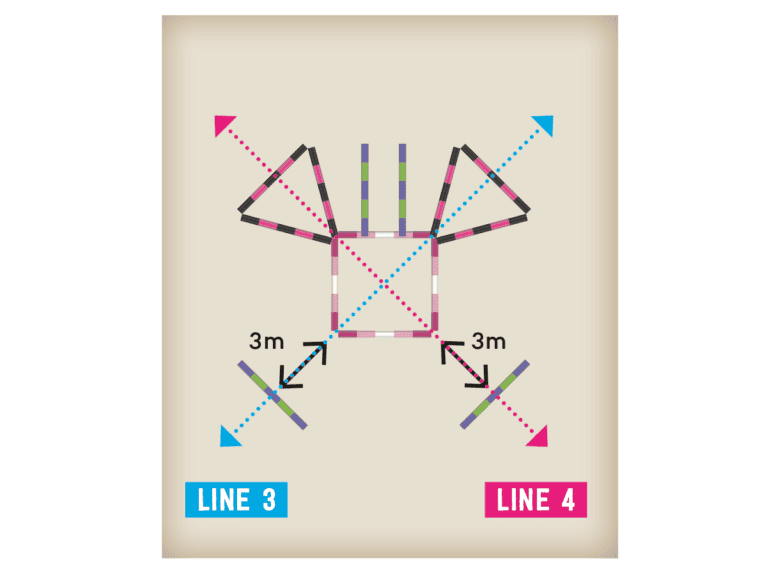
Lines 3 and 4 are all about riding accurately, which is an ultra important skill whether you do cross-country, showjumping or dressage. The aim is still to ride a straight line, but you have very specific points to aim for – the corners of the square and point of the triangle.
Ride through line 3, starting at the base of one triangle to the point where it meets the square then out over the opposite corner and, finally, the pole. It’s a good idea to ride through this line first because the triangle will naturally channel your pony into the first point. Then, once you’re confident, have a go at line 4, starting with the individual pole, to really test your accuracy. Don’t forget to ride through each line on both reins to keep your pony working evenly.
Think about…
- squeezing with both legs to encourage your pony to step over the points, rather than to the side
- keeping your upper body facing forward and eyes focused on your line
Test your pony’s suppleness
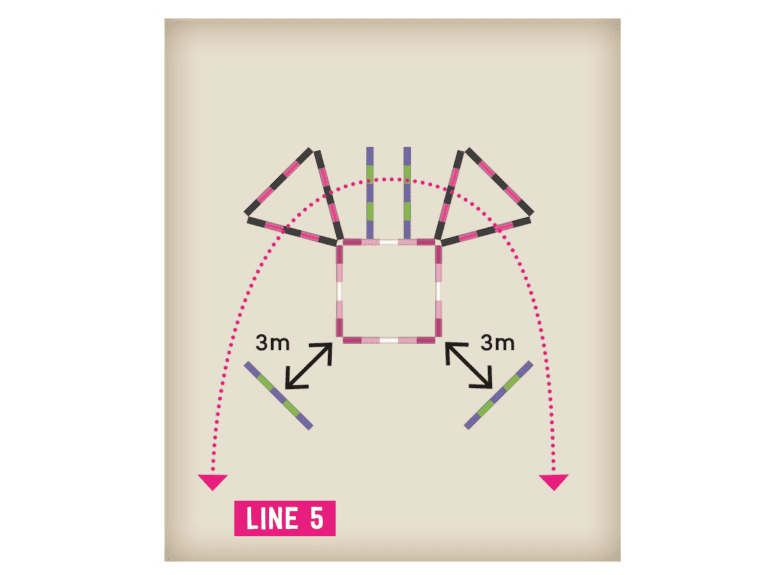
Now it’s time to test your pony’s suppleness by riding a curved line. The aim is to keep him bending through his body in the direction he’s going as he steps over each pole.
Start by riding around the outside of the individual pole and direct him towards the triangle. Then ride around the six poles on a bending line – if the striding is too long, move towards the point of the triangle, if it’s too short, move further towards the base of it.
Think about…
- using the inside rein to turn your pony’s head and closing the outside rein to support his shoulder
- applying pressure with your inside leg on the girth to encourage him to bend through his body
Keep your polework varied
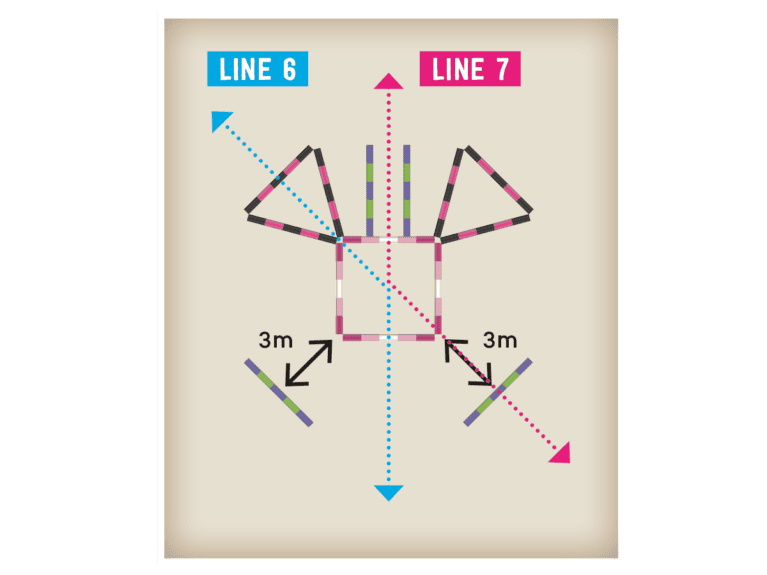
Once you’ve aced the direct lines, have a go at mixing it up so your pony can’t predict where you’re going. These lines involve riding straight, making a turn then riding straight again and will help check his responsiveness, as well as your aids and position. They can be ridden in both directions, and don’t forget to try every line on both reins.
Think about…
- using your body, seat and legs to turn your pony, rather than pulling on the reins
- counting your rhythm so you don’t slow down on the turn
Happy days
When you feel confident in walk and trot, have a go at cantering through the straight lines. Your pony may find it tricky if he’s not well-balanced but keep practising over a few sessions and he’s sure to improve. Don’t forget to reward him when he’s done a good job, too!
Our expert – Nina Gill is a BHS Stage 4 Senior Coach and owner of Fancy Footwork Equestrian
Your Comments
Related Articles


Leave a Reply
You must be logged in to post a comment.